个人简介
专注系统运维、网络架构,研究技术凯发app官方网站的解决方案,记录我的思想轨迹、工作学习、生活和关注的领域
文章分类
相关博文
- ·
- ·
- ·
- ·
- ·
- ·
- ·
- ·
- ·
- ·
分类: 系统运维
2013-09-13 16:56:42
最近接手服务器系统监控项目,开源软件hyperic-hq,安装了测试环境熟悉下。
hyperic hq 是一个开源的it管理框架,让用户使用统一的界面来管理各种不同的it技术。
下载地址:
我使用的是4.6版本,官方已经更新到5.0版本
下载安装包要注意,有32,64位选择,由于我的系统是64bit,下面的测试软件都将使用64bit。大家可以根据自己环境安装。
一、server端安装:
hyperic-hq-installer-4.6-x86-64-linux.tar.gz
安装步骤
1 新建hyperic用户
2 解压下载文件移动到/var/lib/hyperic
3 切换hyperic用户
4 执行
按步骤提示安装
hyperic-hq可以支持报考mysql、oracle、postgresql等数据库,详细可以查看官方文档。我就简单说明下:
报错执行:
you must run this script as root:
/var/lib/hyperic-hq-installer-4.6/installer/data/hqdb/tune-os.sh
5 安装完毕之后,切换root用户启动命令
6 相应端口对外限制 7443端口对客户机开放 7080端口对访问ip开放
二、客户端安装:
现在包hyperic-hq-agent-4.4.0-1509-x86_64-linux.tar
解压
编辑配置文件
三、浏览器登陆
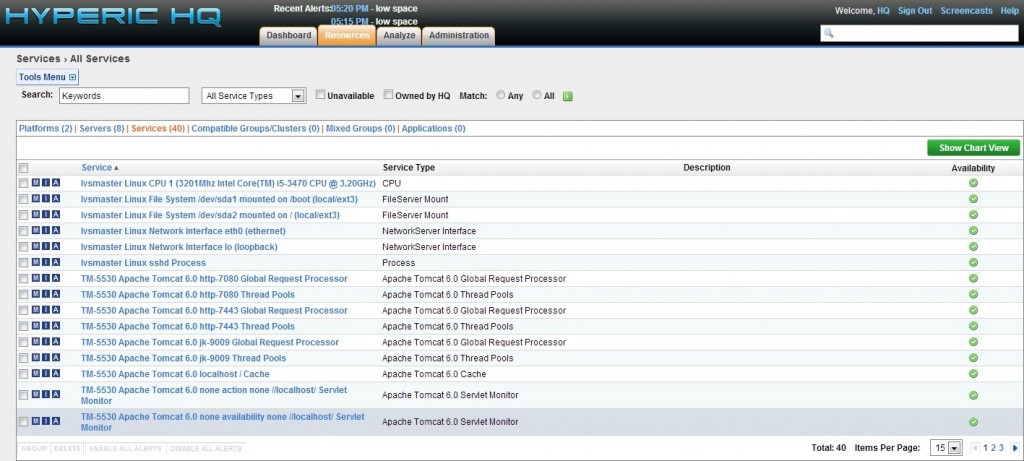
此时服务器将会自动显示客户端监控ip及系统自带的监控项目
如果出现监控项目异常(如出现感叹号),请确认服务端和客户端的时间是否一样。
这只是开始,后期很多需要细细研究……
hyperic hq 是一个开源的it管理框架,让用户使用统一的界面来管理各种不同的it技术。
下载地址:
我使用的是4.6版本,官方已经更新到5.0版本
下载安装包要注意,有32,64位选择,由于我的系统是64bit,下面的测试软件都将使用64bit。大家可以根据自己环境安装。
一、server端安装:
hyperic-hq-installer-4.6-x86-64-linux.tar.gz
安装步骤
1 新建hyperic用户
- #useradd hyperic
- #tar -zxvf hyperic-hq-installer-4.6-x86-64-linux.tar.gz
- #mv hyperic-hq-installer-4.6 /var/lib/
- #su - hyperic
- $
- #/var/lib/hyperic-hq-installer-4.6/setup.sh -postgresql
hyperic-hq可以支持报考mysql、oracle、postgresql等数据库,详细可以查看官方文档。我就简单说明下:
这里我选择支持postgresql数据库安装:
- 默认安装:/var/lib/hyperic-hq-installer-4.6/setup.sh 那么将使用hyperic-hq自带postgresql数据库
- 支持其他数据库安装:/var/lib/hyperic-hq-installer-4.6/setup.sh -full 在交互中选择自己想要的数据库
- 支持postgresql数据库安装:/var/lib/hyperic-hq-installer-4.6/setup.sh -postgresql
- # su - hyperic
- -bash-3.2$ /var/lib/hyperic-hq-installer-4.6/setup.sh -postgresql
- unpacking jre to temporary directory /tmp/jre
- please ignore references to missing tools.jar
- unable to locate tools.jar. expected to find it in /tmp/lib/tools.jar
- loading taskdefs...
- taskdefs loaded
- initializing hyperic hq 4.6 installation...
- choose which software to install:
- 1: hyperic hq server
- 2: hyperic hq agent
- you may enter multiple choices, separated by commas.
- 1
- hq server installation path [default '/home/hyperic']:
- enter the fully qualified domain name of the smtp server that hq will use to send email messages [default '192.168.138.1']:
- enter the email address that hq will use as the sender for email messages [default '[email protected]']:
- enter an encryption key to use to encrypt the database password.:
- what should the username be for the initial admin user? [default 'hqadmin']:
- what should the password be for the initial admin user?:
- (again):
- what should the email address be for the initial admin user? [default '[email protected]']:
- loading install configuration...
- install configuration loaded.
- preparing to install...
- validating server install configuration...
- checking server webapp port...
- checking server secure webapp port...
- verifying admin user properties
- validating server db configuration...
- installing the server...
- unpacking server to: /home/hyperic...
- creating server configuration files...
- copying binaries and libraries to server installation...
- copying server configuration file...
- copying server db-upgrade files...
- copying server libs...
- setting up server database...
- setting up jdbc driver...
- copying database files...
- configuring database...
- loading taskdefs...
- taskdefs loaded
- starting repopulation of configuration table...
- starting built-in database...
- waiting for built-in database to start (on port 9432)...
- preparing database...
- loading taskdefs...
- taskdefs loaded
- loading taskdefs...
- taskdefs loaded
- loading taskdefs...
- taskdefs loaded
- waiting for server to stop...
- stopping built-in database...
- built-in database stopped.
- installing the server jre ...
- unpacking jre amd64-linux-1.6.tar.gz to: /home/hyperic/server-4.6...
- setting permissions on /home/hyperic/server-4.6...
- setting permissions on server binaries...
- fixing line endings on text files...
- --------------------------------------------------------------------------------
- installation complete:
- server successfully installed to: /home/hyperic/server-4.6
- --------------------------------------------------------------------------------
- you can now start your hq server by running this command:
- /home/hyperic/server-4.6/bin/hq-server.sh start
- note that the first time the hq server starts up it may take several minutes
- to initialize. subsequent startups will be much faster.
- once the hq server reports that it has successfully started, you can log in
- to your hq server at:
- username: hqadmin
- password: hqadmin
- to change your password, log in to the hq server, click the "administration"
- link, choose "list users", then click on the "hqadmin" user.
- setup completed.
- a copy of the output shown above has been saved to:
- /var/lib/hyperic-hq-installer-4.6/installer/logs/hq-install.log
- deleting temporary jre
you must run this script as root:
/var/lib/hyperic-hq-installer-4.6/installer/data/hqdb/tune-os.sh
5 安装完毕之后,切换root用户启动命令
- $exit
- #chmod x /home/hyperic/server-4.6/bin/hq-server.sh
- #/bin/su - hyperic -c '/home/hyperic/server-4.6/bin/hq-server.sh start'
- starting hq server...
- # netstat -ntlp | grep java
- tcp 0 0 0.0.0.0:7080 0.0.0.0:* listen 24037/java
- tcp 0 0 0.0.0.0:7443 0.0.0.0:* listen 24037/java
现在包hyperic-hq-agent-4.4.0-1509-x86_64-linux.tar
解压
- #tar -zxvf hyperic-hq-agent-4.4.0-1509-x86_64-linux.tar
- #mv hyperic-hq-agent-4.4.0 /root/soft/
- #vim /root/soft/hyperic-hq-agent-4.4.0/conf/agent.properties
- #末尾添加:
- agent.setup.camip=192.168.138.1 #指向server端ip
- agent.setup.camport=7080 #端口
- agent.setup.camsslport=7443
- agent.setup.camsecure=yes
- agent.setup.camlogin=hqadmin #登陆账号
- agent.setup.campword=hqadmin #登陆密码
- agent.setup.agentip=192.168.138.134 #客户端ip
- agent.setup.agentport=2144 #客户端监听端口
- #/root/soft/hyperic-hq-agent-4.4.0/bin/hq-agent.sh start
此时服务器将会自动显示客户端监控ip及系统自带的监控项目
如果出现监控项目异常(如出现感叹号),请确认服务端和客户端的时间是否一样。
这只是开始,后期很多需要细细研究……
给主人留下些什么吧!~~